A Tale of Migration: From Username to Email in AWS Cognito
Imagine this: your platform has grown exponentially, and the system you architected now serves thousands of users across the globe. Everything seems to be running smoothly until you realize it’s time for a change — a significant one. Recently, we found ourselves at a crossroads that many growing businesses face: adapting to evolving needs while ensuring minimal disruption for our users.
We had a scenario where we needed to migrate all our user data — around 50,000 active users — from one AWS Cognito User Pool to another. This wasn’t just a simple database shift; it came with a twist. When we initially set up our Cognito User Pool, we opted for username-based logins, thinking it was the most user-friendly option. However, as our platform matured, feedback and analytics pointed us in a different direction: users preferred logging in with their email addresses.
So, we had two critical tasks:
- Move 50K users seamlessly from the old Cognito User Pool to a new one.
- Transition the login mechanism from username-based to email-based, ensuring user accounts remained intact and operational.
This challenge wasn’t just technical — it was strategic. We needed to ensure no data was lost, user sessions remained secure, and the new login method was both intuitive and efficient. It was the kind of problem that requires both careful planning and flawless execution.
This is the story of how we tackled this migration step by step, navigating through potential pitfalls and emerging with a system that not only met our current needs but set the stage for future growth. Let’s dive in.
Tools and Setup for the AWS Cognito Migration
When tackling a migration project of this scale and complexity, having the right tools at your disposal is essential. Here’s a rundown of the key tools I used and how I set them up on my MacBook Pro to ensure a seamless migration process:
1. jq
jq is a lightweight, command-line JSON processor that’s incredibly handy for parsing and manipulating JSON data. Since AWS CLI commands often output JSON, jq becomes an indispensable tool for filtering and transforming that data during the migration.
sudo apt-get install jq  # Ubuntu/Debian
brew install jq          # macOS
Once installed, you can verify the installation with:
jq --version2. AWS CLI
The AWS CLI is the backbone of the migration process. It enables interaction with AWS services directly from the command line, making it crucial for exporting and importing Cognito user data.
Installation Steps:
Follow the official AWS CLI installation guide for your platform:
👉 AWS CLI Installation Guide
After installation, confirm the setup by running:
aws --versionThen, configure your AWS credentials:
aws configureYou’ll be prompted to enter:
- AWS Access Key ID
- AWS Secret Access Key
- Default region (e.g.,
us-east-1) - Output format (e.g.,
json)
Important Permissions Note:
Ensure the user whose Access Key you use has the necessary permissions to perform Cognito-related actions. The best practice is:
- Create a Role: Create an IAM role with specific permissions for AWS Cognito actions (like
cognito-idp:ListUsers,cognito-idp:AdminCreateUser, etc.). - Assign the Role: Attach the role to the user account whose Access Key you will use for the migration.
This approach follows AWS security best practices, granting only the required permissions while minimising risk.
3. Your MacBook Pro
The performance and reliability of your MacBook Pro make it an excellent choice for running migration scripts and tools. It ensures smooth execution of resource-intensive tasks like exporting large user pools.
With these tools installed and configured, you’re ready to dive into the process of migrating your AWS Cognito user data efficiently. Up next, we’ll explore the detailed steps and scripts to execute this migration seamlessly.
Step 1: Exporting the Cognito User Pool
Unfortunately, the AWS Cognito dashboard does not provide a built-in option to export users directly. To overcome this, we need to use the AWS CLI and a shell script to extract the user data from the source Cognito User Pool. Below is the script to achieve this:
Export Script
#!/bin/bash

# Variables
USER_POOL_ID="your-source-user-pool-id"  # Replace with your Cognito User Pool ID
AWS_PROFILE="source-account-profile"    # Replace with your AWS CLI profile name
AWS_REGION="your-region"                # Replace with your AWS region
OUTPUT_FILE="users.json"                # Output file for user data

# Initialize
echo "[" > $OUTPUT_FILE
TOKEN=""

# Function to fetch users
fetch_users() {
  local token=$1
  if [ -z "$token" ]; then
    # Initial request
    aws cognito-idp list-users \
      --user-pool-id "$USER_POOL_ID" \
      --profile "$AWS_PROFILE" \
      --region "$AWS_REGION"
  else
    # Paginated request
    aws cognito-idp list-users \
      --user-pool-id "$USER_POOL_ID" \
      --profile "$AWS_PROFILE" \
      --region "$AWS_REGION" \
      --pagination-token "$token"
  fi
}

# Fetch users with pagination
while :; do
  echo "Fetching users..."

  RESPONSE=$(fetch_users "$TOKEN")
  USERS=$(echo "$RESPONSE" | jq '.Users')

  # Append users to the output file
  echo "$USERS" | jq -c '.[]' >> $OUTPUT_FILE.tmp

  # Check for the next token
  TOKEN=$(echo "$RESPONSE" | jq -r '.PaginationToken // empty')

  # Break loop if no more tokens
  if [ -z "$TOKEN" ]; then
    break
  fi
done

# Combine users into a JSON array
sed -i '$!s/$/,/' $OUTPUT_FILE.tmp
cat $OUTPUT_FILE.tmp >> $OUTPUT_FILE
echo "]" >> $OUTPUT_FILE

# Clean up
rm -f $OUTPUT_FILE.tmp

echo "Export complete. Users saved to $OUTPUT_FILE"
How It Works:
- Setup Variables: Replace placeholders with your AWS Cognito User Pool ID, CLI profile name, and region.
- Pagination Handling: The script handles paginated responses from AWS Cognito using the
PaginationToken. - JSON Output: Extracted users are saved to a file (
users.json) in JSON format.
Steps to Run
- Save the script to a file, for example,
export-users.sh. - Make the script executable:
chmod +x export-users.sh- Run the script:
./export-users.shOutput
The script generates a file named users.json containing all the users from the source Cognito User Pool. This file will be used in the next step to import users into the new User Pool.
[
  {
    "Username": "GAK",
    "Attributes": [
      { "Name": "sub", "Value": "d2c03be4-25f3-4be3-8b30-f137a8578ad3" },
      { "Name": "email_verified", "Value": "true" },
      { "Name": "email", "Value": "gak@example.com" },
      { "Name": "name", "Value": "ANIL KUMAR G" },
      { "Name": "preferred_username", "Value": "GAK" }
    ],
    "UserCreateDate": "2024-01-23T02:40:26.413000+05:30",
    "UserLastModifiedDate": "2024-01-23T02:40:26.413000+05:30",
    "Enabled": true,
    "UserStatus": "CONFIRMED"
  },
  {
    "Username": "AKG",
    "Attributes": [
      { "Name": "sub", "Value": "c4dc04ea-6453-4731-bddc-aef2d77bd4d0" },
      { "Name": "email_verified", "Value": "true" },
      { "Name": "email", "Value": "akg@example.com" }
    ],
    "UserCreateDate": "2024-01-17T17:03:13.142000+05:30",
    "UserLastModifiedDate": "2024-01-17T17:03:13.142000+05:30",
    "Enabled": true,
    "UserStatus": "CONFIRMED"
  }
]
Step 2: Importing Users to the New Cognito User Pool
Now that we have exported the user data, the next step is to import it into the new Cognito User Pool. AWS Cognito provides two methods for importing users:
- Cognito Dashboard Import Job (Recommended for large datasets)
- AWS CLI Script (For automation and custom logic)
Option 1: Importing via Cognito Dashboard
The Cognito dashboard import job is the most straightforward method, especially for large datasets. However, it requires the data to be in CSV format.
Converting JSON to CSV
Since our export script generates JSON, we need to convert it to CSV format. Here’s a script to do that:
#!/bin/bash

# Convert JSON to CSV for Cognito import
INPUT_FILE="users.json"
OUTPUT_FILE="users.csv"

# Create CSV header
echo "email,email_verified,name,preferred_username" > $OUTPUT_FILE

# Extract user data and convert to CSV
jq -r '.[] |
  select(.Attributes != null) |
  [
    (.Attributes[] | select(.Name == "email") | .Value // ""),
    (.Attributes[] | select(.Name == "email_verified") | .Value // ""),
    (.Attributes[] | select(.Name == "name") | .Value // ""),
    (.Attributes[] | select(.Name == "preferred_username") | .Value // "")
  ] | @csv' $INPUT_FILE >> $OUTPUT_FILE

echo "CSV conversion complete. Output saved to $OUTPUT_FILE"
Important Notes:
- Ensure the CSV file doesn’t contain any special characters that might cause import failures.
- The
emailandemail_verifiedfields are mandatory for Cognito imports. - Handle any data validation issues that might arise due to unwanted characters or incorrect formats.
Steps to Import via Dashboard
-
Prepare the CSV File:
- Convert the
users.jsonfile into a CSV format compatible with Cognito using the above step.
- Convert the
-
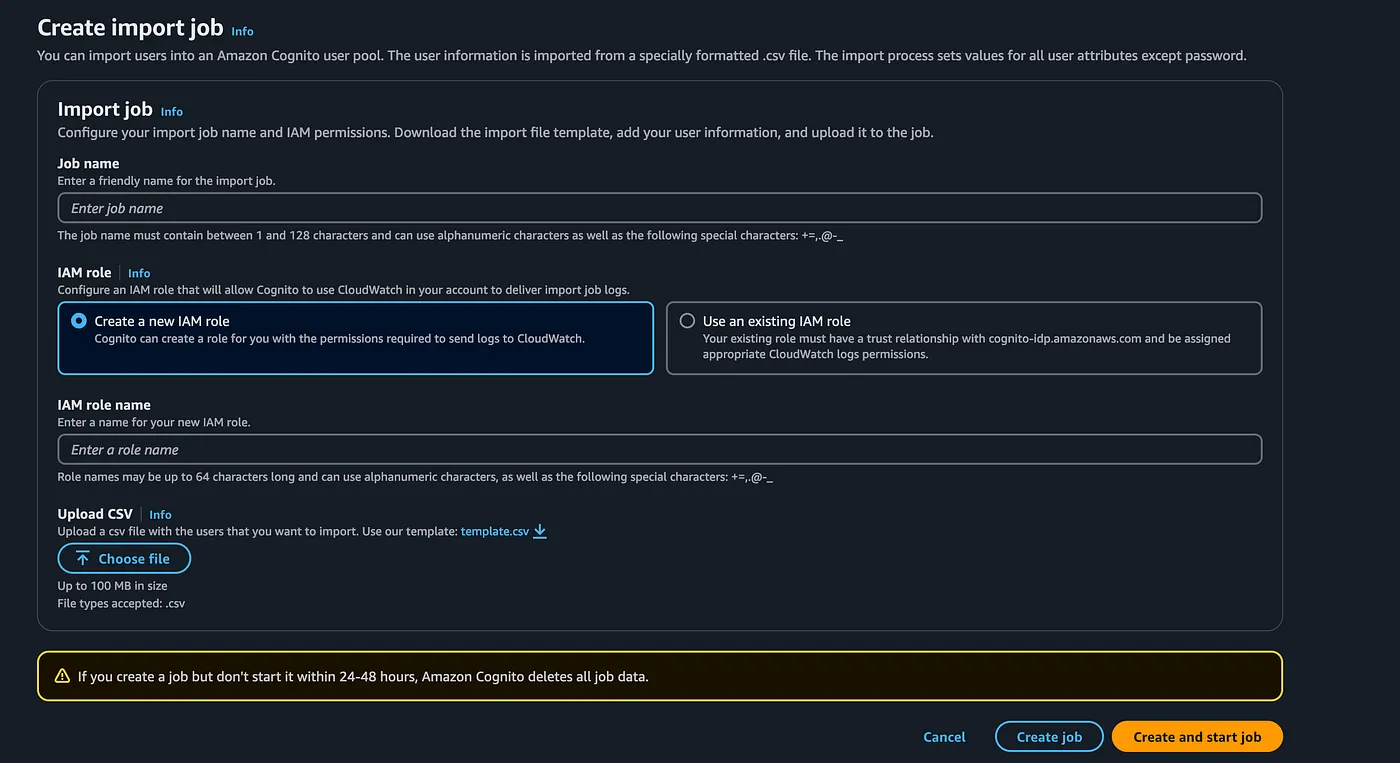
Create an Import Job:
- Go to the AWS Cognito Dashboard.
- Navigate to your target User Pool.
- Select Users > Create Import Job.
-
Upload and Start Import:
- Enter the Job name.
- Select the IAM role. You can create one or select the existing one.
- Upload the CSV file in the import job.
- Create and start job and monitor its progress in the dashboard.
-
Validate:
- Once the job completes, check the imported users in the User Pool.
Option 2: Importing Using a Script (AWS CLI)
If you prefer automating the process or dealing with dynamic data, you can use a script to import users programmatically.
Script with Multi-Threading:
#!/bin/bash

# Variables
USER_POOL_ID="your-source-user-pool-id" # Replace with your Cognito User Pool ID
AWS_PROFILE="source-account-profile"    # Replace with your AWS CLI profile name
AWS_REGION="your-region"                # Replace with your AWS region
INPUT_FILE="part_01.json"                    # Replace with your Input file
THREADS=10                              # Config the threads based on your system configuration

# Export variables for parallel
export USER_POOL_ID AWS_PROFILE AWS_REGION

# Function to import a user into Cognito
import_user() {
  local email="$1"
  local email_verified="$2"
  local name="$3"
  local preferred_username="$4"

  # Ensure email and email_verified are valid before proceeding
  if [ -z "$email" ] || [ -z "$email_verified" ]; then
    echo "ERROR: Missing email or email_verified for user $email. Skipping."
    return
  fi

  # Prepare user attributes for Cognito
  user_attributes=("Name=email,Value=$email" "Name=email_verified,Value=$email_verified")

  # Only add 'name' if it is non-null and non-empty
  if [ -n "$name" ] && [ "$name" != "null" ]; then
    user_attributes+=("Name=name,Value=$name")
  fi

  # Only add 'preferred_username' if it is non-null and non-empty
  if [ -n "$preferred_username" ] && [ "$preferred_username" != "null" ]; then
    user_attributes+=("Name=preferred_username,Value=$preferred_username")
  fi

  # Create user in Cognito
  echo "Creating user: $email"
  aws cognito-idp admin-create-user \
    --user-pool-id "$USER_POOL_ID" \
    --username "$email" \
    --user-attributes "${user_attributes[@]}" \
    --profile "$AWS_PROFILE" \
    --region "$AWS_REGION" \
    --message-action "SUPPRESS" || echo "Failed to create user: $email"
}

# Export the function for parallel
export -f import_user

# Process JSON and pass data to the function using parallel
jq -c '.[] | select(.Attributes != null) | {
  email: (.Attributes[] | select(.Name == "email") | .Value),
  email_verified: (.Attributes[] | select(.Name == "email_verified") | .Value),
  name: ((.Attributes[] | select(.Name == "name") | .Value) // null),
  preferred_username: ((.Attributes[] | select(.Name == "preferred_username") | .Value) // null),
}' "$INPUT_FILE" | \
parallel -j "$THREADS" --pipe bash -c '
  while IFS= read -r data; do
    email=$(echo "$data" | jq -r .email)
    email_verified=$(echo "$data" | jq -r .email_verified)
    name=$(echo "$data" | jq -r .name)
    preferred_username=$(echo "$data" | jq -r .preferred_username)
    # Call the import_user function with appropriate arguments
    import_user "$email" "$email_verified" "$name" "$preferred_username"
  done
'

echo "User import complete!"
How It Works:
1. Script Variables
USER_POOL_ID: The ID of the target Cognito User Pool where users will be imported.AWS_PROFILE: AWS CLI profile name to authenticate and access resources in the source account.AWS_REGION: The AWS region where the target Cognito User Pool resides.INPUT_FILE: The JSON file containing user data to import.THREADS: Number of threads for parallel execution. Adjust based on your system’s capabilities.
2. Data Parsing
The script uses jq to process the input JSON file. Each user’s attributes are extracted, and relevant fields are prepared for import:
email: The user’s email (mandatory for Cognito imports).email_verified: Indicates if the email is verified.name: Optional attribute, only included if non-null.preferred_username: Optional attribute, only included if non-null.
The jq command extracts and structures this data into a format that can be processed in parallel.
3. Parallel Processing
The script uses GNU parallel to process multiple user entries simultaneously:
--pipe: Feeds the parsed JSON data to parallel tasks.-j "$THREADS": Specifies the number of parallel threads.bash -c: Executes a subshell to process each user record.
This ensures high performance, especially for large datasets.
Install GNU parallel:
sudo apt install parallel  # For Ubuntu/Debian
brew install parallel      # For macOS
4. Import Function
The import_user function creates users in Cognito:
-
Validations:
- Ensures
emailandemail_verifiedare present. - Skips the user if these mandatory fields are missing.
- Ensures
-
Dynamic Attributes:
- Constructs the
user_attributesarray, including only non-null attributes (nameandpreferred_usernameare optional).
- Constructs the
-
AWS CLI Command:
- Uses
admin-create-userto create a user in the Cognito User Pool. - Suppresses the invitation email with
--message-action "SUPPRESS". - Outputs a success or failure message.
- Uses
5. JSON Processing Pipeline
The pipeline breaks down as follows:
- Extract Data:
jqparses the input JSON file and structures user data into a compact format. - Process Records: Each record is passed to a parallel thread.
- Import Users: For each user, the
import_userfunction is called, creating the user in Cognito.
Steps to Run the Script
- Save the script as
import-users.sh. - Make it executable:
chmod +x import-users.sh- Run the script:
./import-users.shOutput
- Displays logs for created users and errors (if any).
- Completes user import with a message:
User import complete!Summary
Migrating users between AWS Cognito User Pools is a critical yet complex task, especially when involving large datasets and changes like switching login methods. This article detailed a step-by-step approach to seamlessly migrate over 50,000 users while transitioning from username to email-based login.
We covered:
- Exporting Users: Using scripts to extract data via AWS CLI.
- Data Transformation: Converting JSON exports into Cognito-compatible CSV formats.
- Importing Users: Offering two methods — Cognito dashboard import jobs and a custom script for direct CLI-based imports.
With a focus on efficiency, best practices, and automation, this guide equips you to handle Cognito migrations with precision and minimal user impact.
I hope you enjoyed this — let me know if you have any questions or suggestions! Please reach out to me via LinkedIn!
You can find all the scripts in this GitHub repo.